Building an Open-Source Recording Studio
After completing development work for the day, I utilize the same machine for guitar practice and recording. The system functions as a Linux-native recording workstation built on a dual-use development setup. Running a stack comprised of ALSA, PipeWire, Reaper, and NAM.
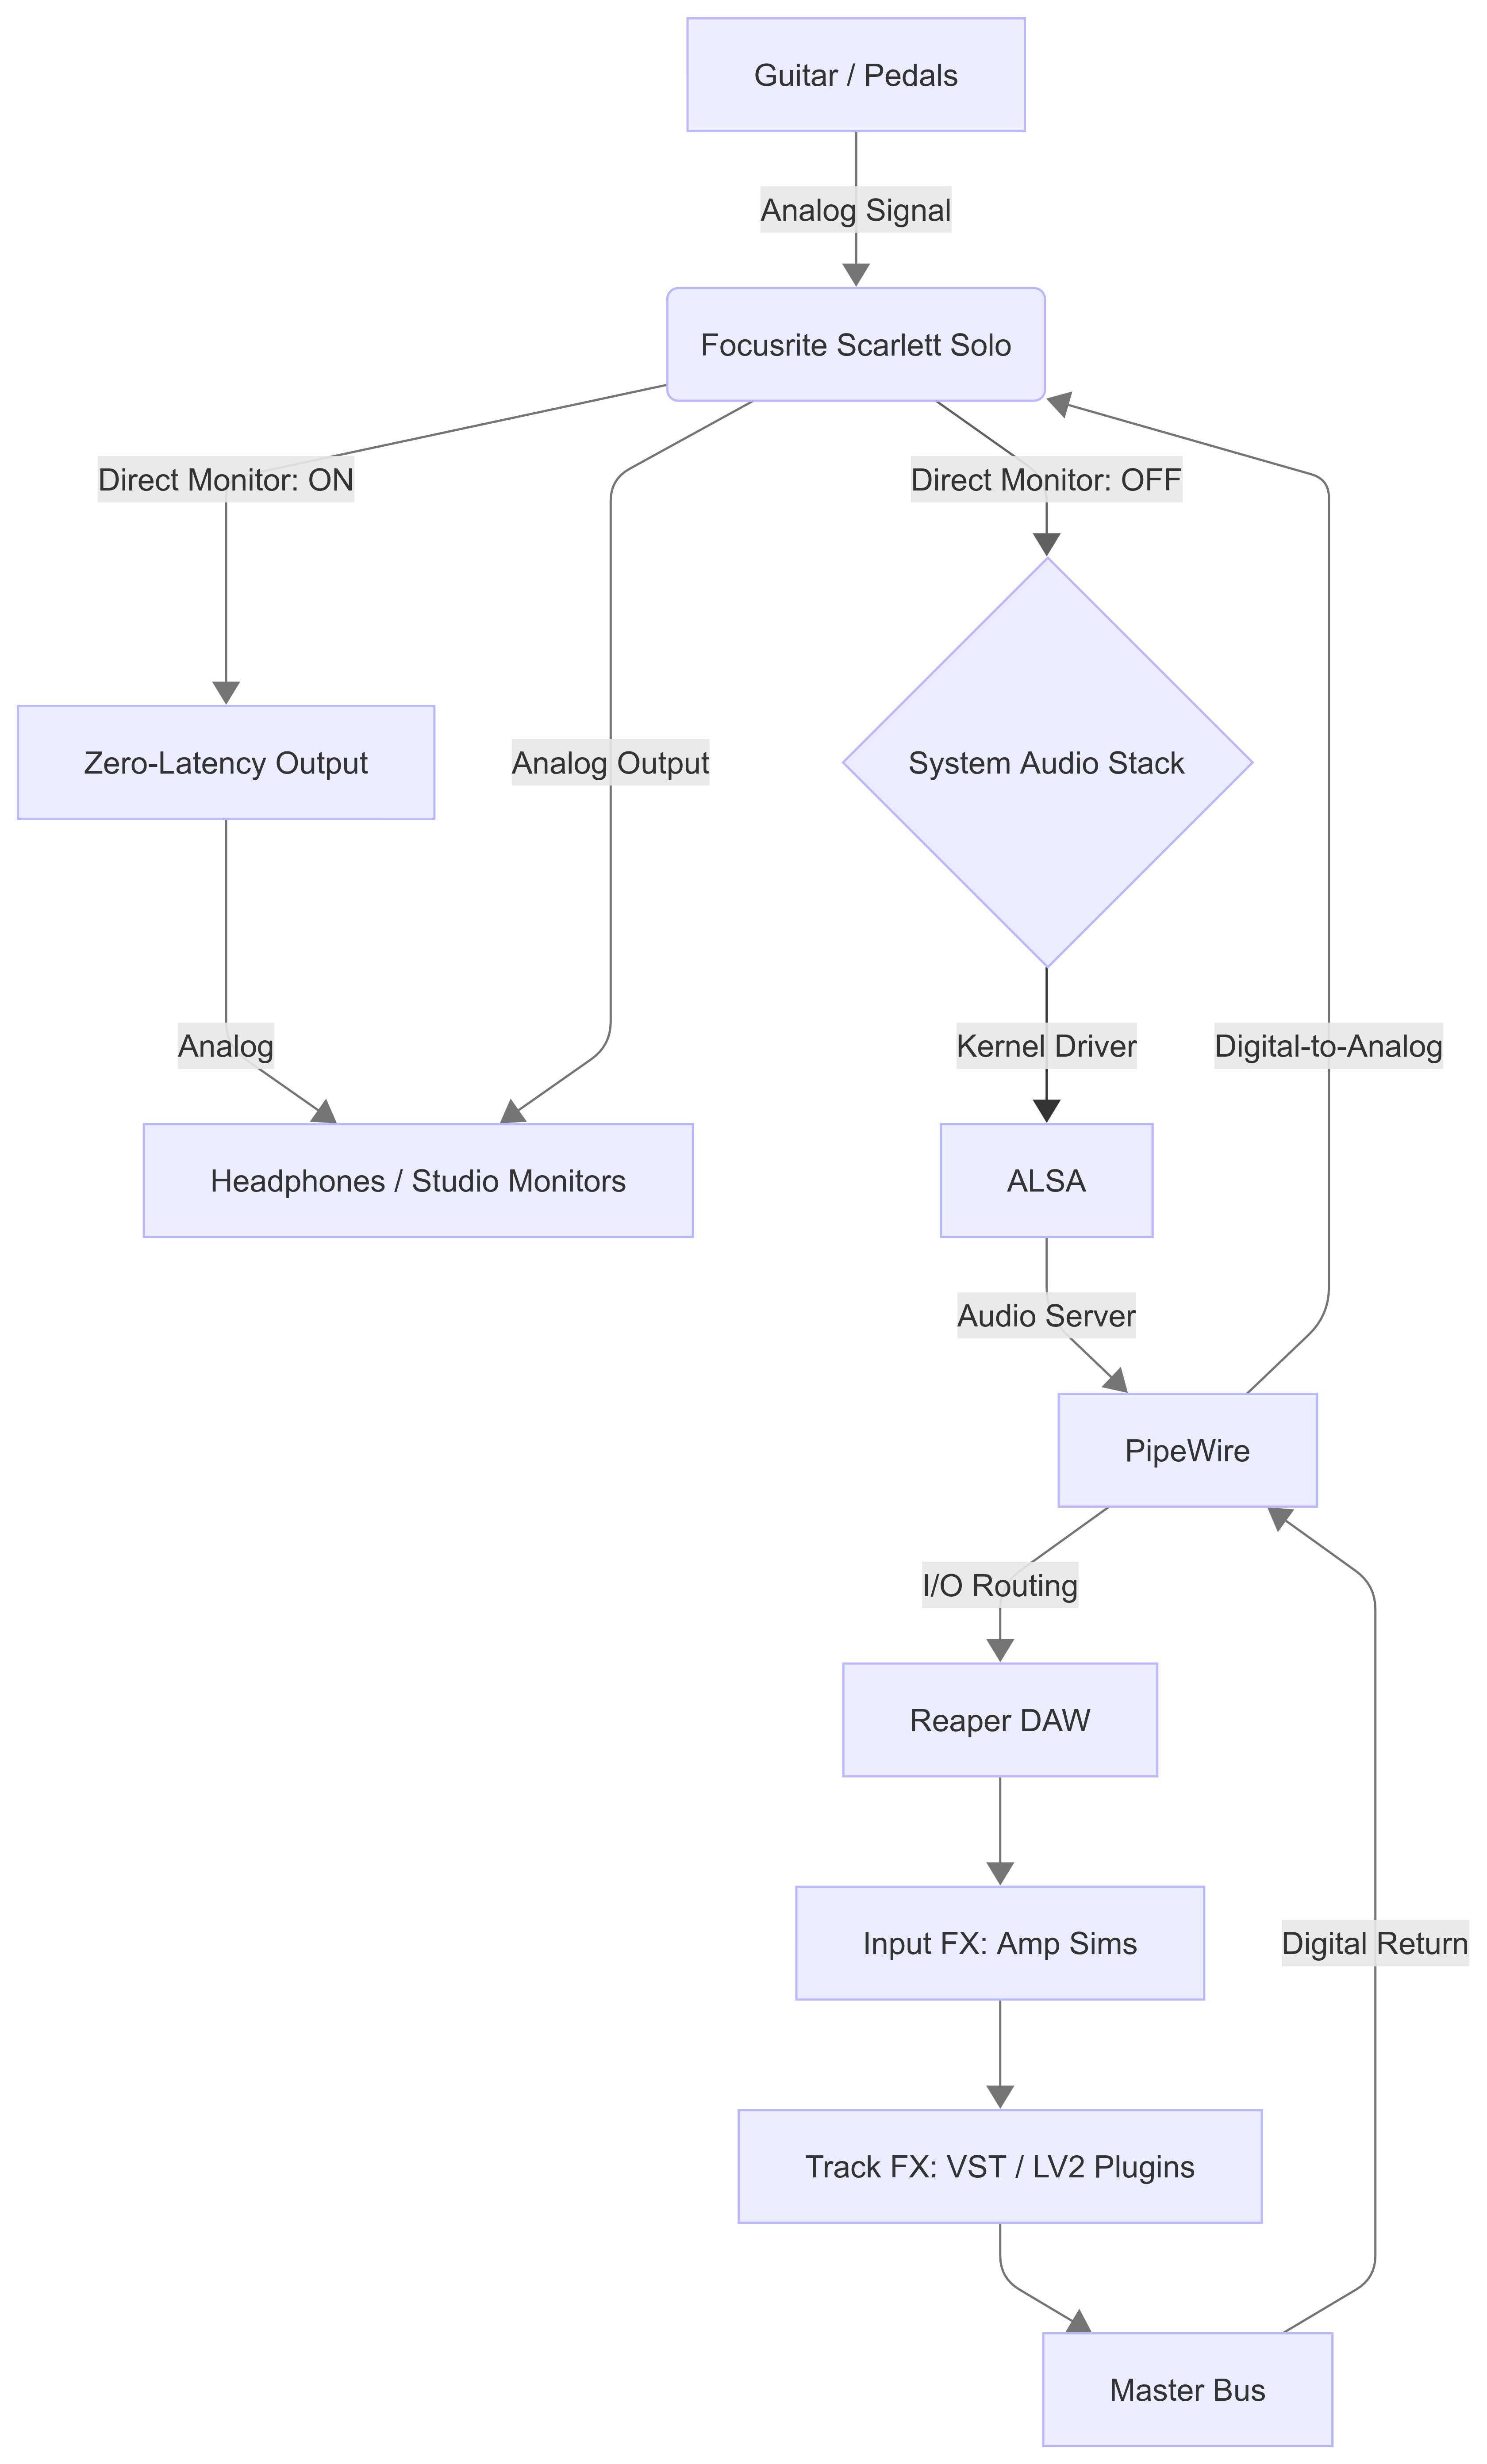
Here is an abstract overview of the build architecture:
Hardware Setup
The core of this setup is an audio interface called Focusrite Scarlett Solo. My version is their 2nd generation which has two inputs, one for the microphone and the other is a 6.3mm audio jack. The purpose of the audio interface is to act as a translator for the guitar and the computer. In the world of music this is called a signal chain, and this chain configuration has two states.
The first state is called Practice Mode. All of this is monitored through the audio interface hardware. It routes the input signal directly to the output, providing zero-latency for minimal latency during standing practice.
The second sate is called Monitored Mode. All of this is monitored by your computers software and signal chain. This requires that you turn off Direct Monitor feature on the interface. So the signal can be routed through Reaper for real-time amp simulation and effects processing.
Centralizing the monitoring through the interface simplifies routing and maintains a consistent audio environment, that enables the user to have a plug and play setup.
You can recreate my exact setup hardware used in the setup includes:
- BOSS TU3 Chromatic Tuner - Input
- BOSS Loper Pedal - Input
- Jackson JS11 Dinky Guitar - Input
- Ernie Ball 10’Straight / Angle Braided Cable Guitar Cables
- Ernie Ball 6’Flat Ribbon Patch Cable
- Yamaha HPH-100B - Output
Software Setup
Reaper was selected as the primary DAW due to its lightweight architecture and Linux compatibility. I installed reaper using their flatpak command
Connecting Your Audio Interface
Direct Input (DI) recording allows me to eliminate variables like room acoustics and microphone placement. To ensure the signal chain remains clean, controllable, and reproducible across sessions. However we do have to spend time managing all the signal chains on the computer. To help us with this issue I use a software called ALSA (Advanced Linux Sound Architecture).
This sound architecture provides audio and MIDI functionality to the Linux operating system. To get ALSA to work with your audio interace. We have to jump into Reaper, and pen the settings menu by pressing CTRL+P then heading to > audio > device.
Then the right panel shall include some settings and are the settings I recommend:
Audio System: ALSA
Input Channels: 4
Output Channels: 4
Input Device - hw:USB, USB-AUdio - Scarlett Solo USB
Output Device - hw:USB, USB-AUdio - Scarlett Solo USB
Sample Rate 48k or 48,000
Block Size: 256
Bit Depth: 32
Periods: 3

RT Priotiry Default

[x] Auto-suspend PluseAudio
[] Disable power management if supported (requires premssions)
[] Lock process memory with mlockall() (CAUTION)https://www.justin-bento.com/blog/post-1/

[X] Allow projects to override device sample rate.
Click apply when changes are made. Listen to “Distant Ridges” on Soundcloud to see how the audio sounds without any affects.
Adding Neural Amp Modeler For Effects
According to their website, Neural Amp Modeler is an open-source project that uses deep learning to create models of guitar amplifiers and pedals with state-of-the-art accuracy. To integrate this into a Linux-native workflow, we utilize the LV2 plugin format.
- Download the Plugin:
- Grab the latest Neural Amp Modeler LV2 release from GitHub.
- Environment Setup:
- NAM requires Python to handle specific processing tasks.
- If you haven’t configured it yet, follow this guide to install Python on Linux Mint.
- Initialize the Plugin Directory:
- Open your terminal and ensure the local LV2 directory
firstlastName@computer:~$ cd
firstlastName@computer:~$ mkdir -p ~/.lv2`- Install the Plugin:
- Extract the downloaded NAM archive,
- Move the folder into your newly created ~/.lv2 directory.
- Configure Reaper:
- Create a new track and Arm it (click the red circle).
- Select your hardware input (e.g., Input 2 for a Scarlett Solo guitar DI).
- Ensure Record Monitoring is ON to hear the processed signal.
- Load the Effect:
- Click the FX button on the track.
- In the “Add FX” window, search for Neural Amp Modeler and add it to the chain.
- Sourcing Tones:
- Visit Tone3000 to download .nam model files.
- These represent the “DNA” of specific physical amps.
- Load the Model:
- Within the NAM plugin interface, click the folder icon.
- locate your downloaded .nam file.
Engage the circuit.
Here’s another track I made with the nam working.
Navigating the Linux Audio Trade-offs
Operating a professional audio stack on Linux involves known trade-offs:
- Ecosystem Constraints: The plugin market is primarily optimized for macOS/Windows; however, native LV2 and VST3 formats provide high-quality alternatives.
- Documentation-Driven Troubleshooting: Unlike mainstream “plug-and-play” systems, resolving driver quirks or routing adjustments requires deep dives into forums and manual configuration. I tried my best making it as straightforward as possible.Reaper was selected as the primary DAW due to its lightweight architecture and Linux compatibility
- System Familiarity: Success depends on a baseline understanding of the Linux audio stack (ALSA and PipeWire) and understanding how files work on linux.
The result of this effort is increased transparency and system-level control. This level of customization allows me to share my specific FX Chains and software configurations with the community via GitHub.
Conclusion
This workstation is the result of incremental decisions to move away from proprietary setups in favor of a Linux-native environment. I am proud to have evolved this system into a reliable tool for both my music and my code. I am grateful to my mate for the support and resources that allowed me to focus on this build.
If this has worked for you please let me know by sending me an email.